support@plankton.mobi


2. Support – Help Desk
2.1 Users
2.1.1 Searching for Users
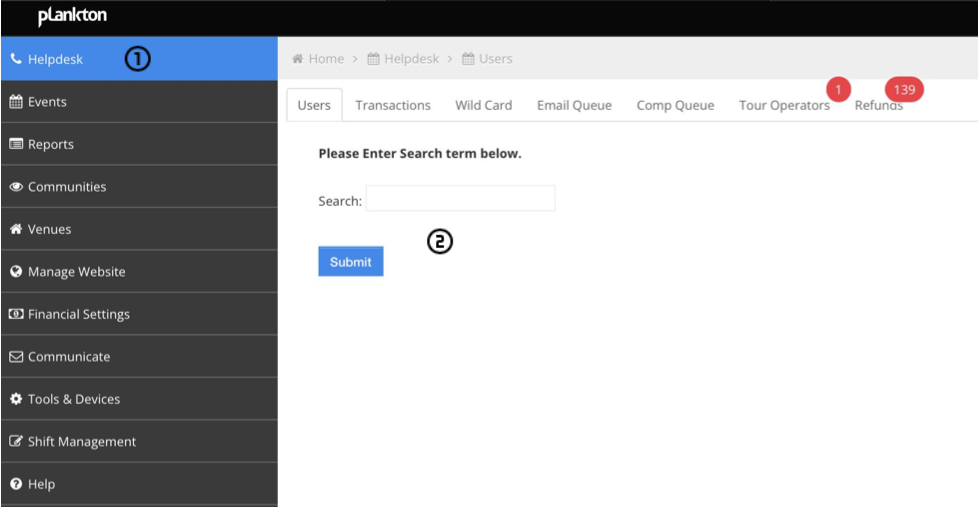
- Acces the Help Desk by clicking on “Help Desk” in the menu on the left side of the screen.
- Enter the users name/surname or email address in the search bar and click on submit to start the search.
Note: There are millions of users registered on the Plankton Platform. In order to narrow down the search please enter the users email address if possible
2.1.2 User Accounts
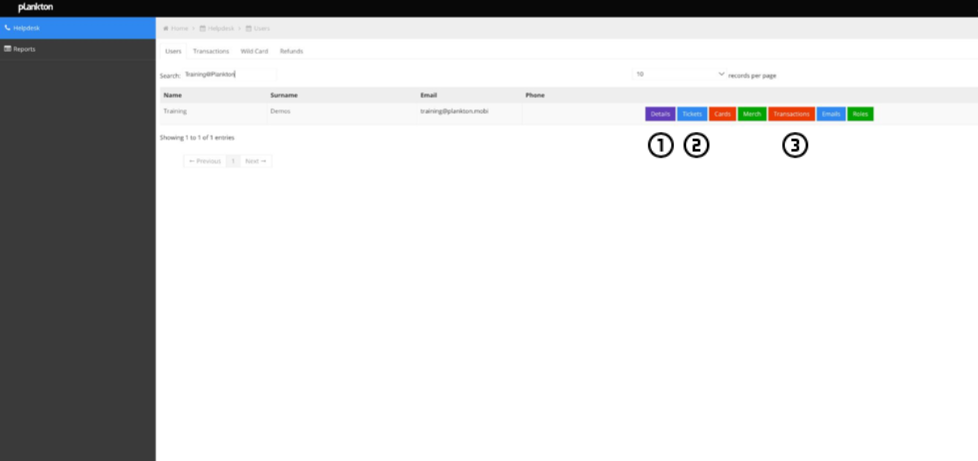
- Click on “Details” to view and/or edit a users details.
- Click on Tickets to view the users available tickets.
- Click on Transactions to view all the user’s transactions
User’s Tickets Page:
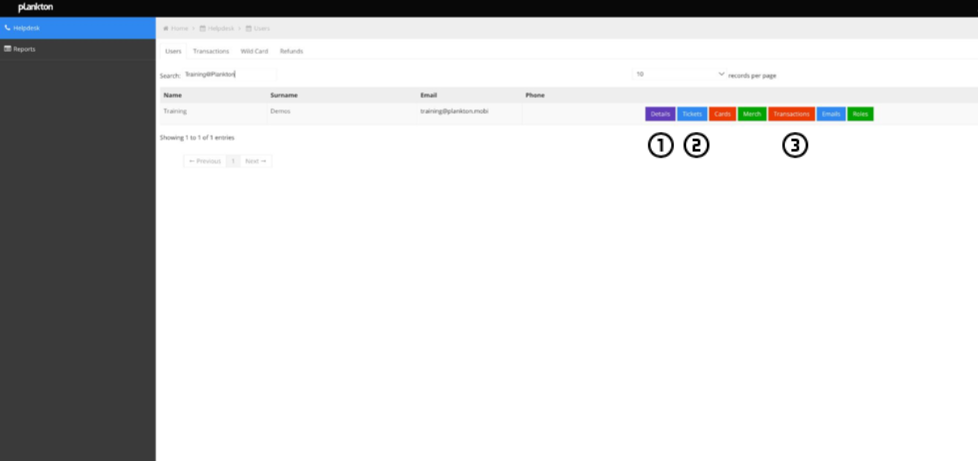
The tickets page has 2 functions:
- Viewing a user’s available tickets
- Downloading a user’s available tickets
Viewing a users tickets will allow you to access individual tickets with the guest info attached to the specific ticket. It will also allow you to refund individual tickets in case of a partial refund request as well as see what time the ticket was redeemed.
When downloading a users tickets you will receive the ticket in a PDF file that can be sent to the customer via email.
User’s Transactions Page:
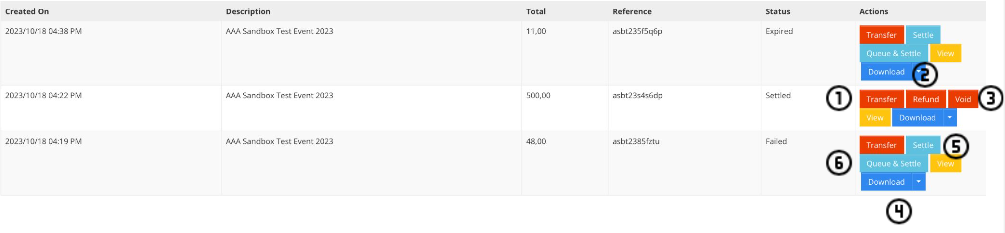
The transactions page has 5 functions:
- Transferring a ticket to a different account – To Transfer a ticket to adifferent user click on the “Transfer” button. On the next page enter the new users email address and click on “Transfer” to complete the process.
- Refunding a transactions
- Voiding a transaction
- Downloading a transaction invoice in PDF format as well as the option to download the user’s tickets
- Settling a expired/failed transaction
- Settling and triggering email to the client for expired/failed transactions
Note: Always verify payment before settling a transaction.
2.1.3 Adding a New User

On the main Help Desk Page you can click on “Add User” to create a new account. Enter the name, surname, email address and password for the new user. In the “Role” drop menu down choose the customer option and click on “save” to finish the process
2.2 Transactions
2.2.1 Searching for a transaction
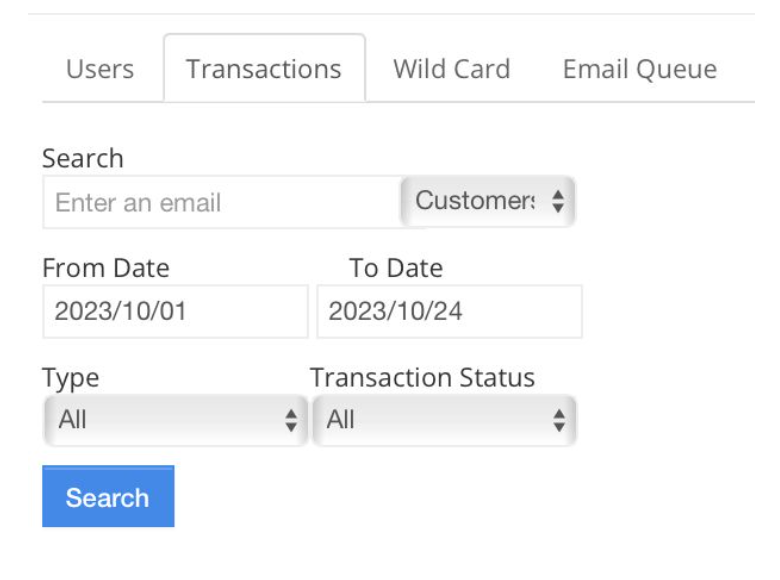
On the main Help Desk Page you can click on the transactions tab to access the transaction search page. There are multiple ways of searching for a transactions:
- By reference number
- By Customer Email
- By Ticket Issuer – The ticket issuer will be the cashier at the gate that sold the ticket.
Note: This option can only be used to search for transactions that were done by cashiers and will not return any results for online transactions. - By Booking reference number – The Booking reference number is the unique barcode number displayed on each individual ticket.
Choose one of the above options by click on the dropdown menu located next to the text field and enter the relevant information into the provided text field. Note: Remove all spaces before searching for a transaction. If there are any unnecessary spaces inside of the text field the search function will not return any results even though the correct information was entered.
Once you have completed the above you can choose a From and To date. The From Date indicates the start time and the To Date indicates the end time of the search variables.
Now you can click on the “search” button to start the search.
Once you have successfully located the transaction there will be an option to change the booking date of the transaction. This allows you to move the clients tickets to a different date in the future. This will apply to situations where customers can no longer attend the park or activity on the day specified due to illness, emergencies etc.
2.2.2 Payment Validation
There are three types of transactions that will require payment validation:
- Pending transactions are instances where payment was not completed oris still in progress.
- Expired transactions are instances where a pending transaction haspassed a predetermined expiration time meaning that payment was notcompleted within a specified time.
- Failed transactions are instances where payment for the transaction wasunsuccessful or canceled by the customer.
Once you have successfully searched for a transaction you have multiple payment validation options:
- Settling a transaction – This will settle the transaction on the back end essentially marking the transaction as paid.
- Que and Settle – This will settle the transaction as above but also resend the booking confirmation email that contains the PDF tickets to the customer.
- Complete Booking – This option will only be available for EFT transactions. By choosing this option you will be able to to enter the necessary EFT payment details to settle the transaction.
2.2.3 Refunds
There are two types of refunds that can be actioned:
- Full Refund – To action a full refund for the transaction click on the“Refund” button. This will mark the transaction as fully refunded meaning that the entire amount has been refunded to the client.
Note: Please make sure that the refund was processed correctly on the SANparks Payment processor site before refunding the transaction on Plankton Backstage. - Partial Refund – A partial refund is for situations where only certain tickets linked to the transaction need to be refunded and not the full amount. To action a partial refund hover over the reference number under the reference column. The reference number will become underlined and can the be click on to display a list of all the tickets linked to the transaction. Now you can select the individual ticket(s) that have to be refunded be ticking the check boxes located to the right of the ticket(s). Once you have selected the correct ticket(s) click on the green “Refund Selected” button to process the partial refund.